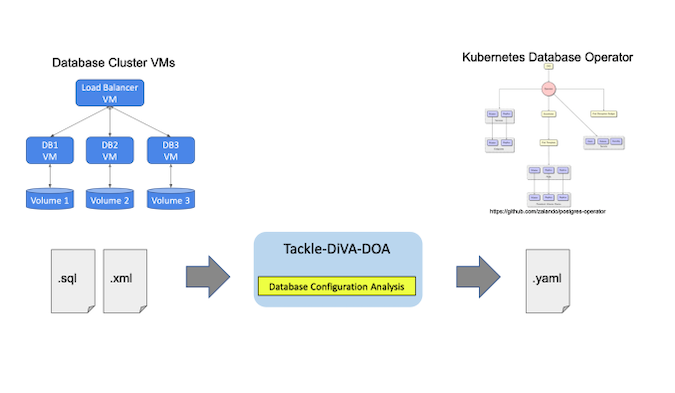
Kubernetes Database Operator is useful for building scalable database servers as a database (DB) cluster. But because you have to create new artifacts expressed as YAML files, migrating existing databases to Kubernetes requires a lot of manual effort. This article introduces a new open source tool named Konveyor Tackle-DiVA-DOA (Data-intensive Validity Analyzer-Database Operator Adaptation). It automatically generates deployment-ready artifacts for database operator migration. And it does that through datacentric code analysis.
What is Tackle-DiVA-DOA?
Tackle-DiVA-DOA (DOA, for short) is an open source datacentric database configuration analytics tool in Konveyor Tackle. It imports target database configuration files (such as SQL and XML) and generates a set of Kubernetes artifacts for database migration to operators such as Zalando Postgres Operator.

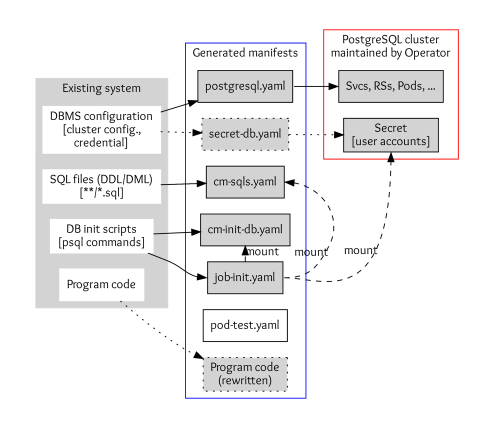
DOA finds and analyzes the settings of an existing system that uses a database management system (DBMS). Then it generates manifests (YAML files) of Kubernetes and the Postgres operator for deploying an equivalent DB cluster.

Database settings of an application consist of DBMS configurations, SQL files, DB initialization scripts, and program codes to access the DB.
- DBMS configurations include parameters of DBMS, cluster configuration, and credentials. DOA stores the configuration to
postgres.yamland secrets tosecret-db.yamlif you need custom credentials.
- SQL files are used to define and initialize tables, views, and other entities in the database. These are stored in the Kubernetes ConfigMap definition
cm-sqls.yaml.
- Database initialization scripts typically create databases and schema and grant users access to the DB entities so that SQL files work correctly. DOA tries to find initialization requirements from scripts and documents or guesses if it can’t. The result will also be stored in a ConfigMap named
cm-init-db.yaml.
- Code to access the database, such as host and database name, is in some cases embedded in program code. These are rewritten to work with the migrated DB cluster.
Tutorial
DOA is expected to run within a container and comes with a script to build its image. Make sure Docker and Bash are installed on your environment, and then run the build script as follows:
$ cd /tmp
$ git clone https://github.com/konveyor/tackle-diva.git
$ cd tackle-diva/doa
$ bash util/build.sh
…
docker image ls diva-doa
REPOSITORY   TAG       IMAGE ID       CREATED        SIZE
diva-doa     2.2.0     5f9dd8f9f0eb   14 hours ago   1.27GB
diva-doa     latest    5f9dd8f9f0eb   14 hours ago   1.27GB
This builds DOA and packs as container images. Now DOA is ready to use.
The next step executes a bundled run-doa.shwrapper script, which runs the DOA container. Specify the Git repository of the target database application. This example uses a Postgres database in the TradeApp application. You can use the -o option for the location of output files and an -i option for the name of the database initialization script:
$ cd /tmp/tackle-diva/doa
$ bash run-doa.sh -o /tmp/out -i start_up.sh \
      https://github.com/saud-aslam/trading-app
[OK] successfully completed.
The /tmp/out/ directory and /tmp/out/trading-app, a directory with the target application name, are created. In this example, the application name is trading-app, which is the GitHub repository name. Generated artifacts (the YAML files) are also generated under the application-name directory:
$ ls -FR /tmp/out/trading-app/
/tmp/out/trading-app/:
cm-init-db.yaml  cm-sqls.yaml  create.sh*  delete.sh*  job-init.yaml  postgres.yaml  test//tmp/out/trading-app/test:
pod-test.yaml
The prefix of each YAML file denotes the kind of resource that the file defines. For instance, each cm-*.yamlfile defines a ConfigMap, and job-init.yamldefines a Job resource. At this point, secret-db.yaml is not created, and DOA uses credentials that the Postgres operator automatically generates.
Now you have the resource definitions required to deploy a PostgreSQL cluster on a Kubernetes instance. You can deploy them using the utility script create.sh. Alternatively, you can use the kubectl createcommand:
$ cd /tmp/out/trading-app
$ bash create.sh  # or simply “kubectl apply -f .”configmap/trading-app-cm-init-db created
configmap/trading-app-cm-sqls created
job.batch/trading-app-init created
postgresql.acid.zalan.do/diva-trading-app-db created
The Kubernetes resources are created, including postgresql (a resource of the database cluster created by the Postgres operator), service, rs, pod, job, cm, secret, pv, and pvc. For example, you can see four database pods named trading-app-*, because the number of database instances is defined as four in postgres.yaml.
$ kubectl get all,postgresql,cm,secret,pv,pvc
NAME                                        READY   STATUS      RESTARTS   AGE
…
pod/trading-app-db-0 1/1     Running     0          7m11s
pod/trading-app-db-1 1/1     Running     0          5m
pod/trading-app-db-2 1/1     Running     0          4m14s
pod/trading-app-db-3 1/1     Running     0          4mNAME                                      TEAM          VERSION   PODS   VOLUME   CPU-REQUEST   MEMORY-REQUEST   AGE   STATUS
postgresql.acid.zalan.do/trading-app-db   trading-app   13 4      1Gi                                     15m   RunningNAME                            TYPE        CLUSTER-IP      EXTERNAL-IP   PORT(S)    AGE
service/trading-app-db          ClusterIP   10.97.59.252    <none> 5432/TCP   15m
service/trading-app-db-repl     ClusterIP   10.108.49.133   <none> 5432/TCP   15mNAME                         COMPLETIONS   DURATION   AGE
job.batch/trading-app-init   1/1           2m39s      15m
Note that the Postgres operator comes with a user interface (UI). You can find the created cluster on the UI. You need to export the endpoint URL to open the UI on a browser. If you use minikube, do as follows:
$ minikube service postgres-operator-ui
Then a browser window automatically opens that shows the UI.

(Yasuharu Katsuno and Shin Saito, CC BY-SA 4.0)
Now you can get access to the database instances using a test pod. DOA also generated a pod definition for testing.
$ kubectl apply -f /tmp/out/trading-app/test/pod-test.yaml # creates a test Pod
pod/trading-app-test created
$ kubectl exec trading-app-test -it -- bash # login to the pod
The database hostname and the credential to access the DB are injected into the pod, so you can access the database using them. Execute the psql metacommand to show all tables and views (in a database):
# printenv DB_HOST; printenv PGPASSWORD
(values of the variable are shown)# psql -h ${DB_HOST} -U postgres -d jrvstrading -c '\dt'
             List of relations
 Schema |      Name      | Type  |  Owner
--------+----------------+-------+----------
 public | account        | table | postgres
 public | quote          | table | postgres
 public | security_order | table | postgres
 public | trader         | table | postgres
(4 rows)# psql -h ${DB_HOST} -U postgres -d jrvstrading -c '\dv'
                List of relations
 Schema |         Name          | Type |  Owner
--------+-----------------------+------+----------
 public | pg_stat_kcache        | view | postgres
 public | pg_stat_kcache_detail | view | postgres
 public | pg_stat_statements    | view | postgres
 public | position              | view | postgres
(4 rows)
After the test is done, log out from the pod and remove the test pod:
# exit
$ kubectl delete -f /tmp/out/trading-app/test/pod-test.yaml
Finally, delete the created cluster using a script:
$ bash delete.sh
