Critical Thinking

Tip: Critical thinking skills can be really valuable for Software engineers, Product and many other walks of life. It’s about approaching new information with a mix of humble curiosity and doubt.

Think independently and ask good questions that help make thoughtful decisions.

In broad strokes, some of the questions I like to ask based on critical thinking are:

➡️ How do we know we’re solving the right problem?
➡️ How do we know we’re solving the problem in the right way? (i.e. balancing rigor and efficiency, given our understanding of the problem and constraints)
➡️ If we don’t know the sources of our problem, how can we determine the root cause?
➡️ How can we break the key question down into smaller questions that we can analyze further?
➡️ Once we have one or more hypotheses, how do we structure work to evaluate them?
➡️ What shortcuts might we take if we’re under constraints (time pressure) without unduly compromising our analytics rigor around the question?
➡️ Does the evidence sufficiently support the conclusions?
How do we know when we are done? When is the solution “good enough”?
➡️ How do I communicate the solution clearly and logically to all stakeholders?

I’ve found these questions often help. Sometimes we’ll address the symptom of a problem, only to discover there are other symptoms that pop up. At other times, we might quickly ship a solution that creates more problems later down the road.

With a lens on critical thinking, we might challenge assumptions, look closer at the risk/benefit, seek out contradictory evidence, evaluate credibility and look for more data to build confidence we are doing the right thing.

Being in engineering or product, we can sometimes rush to solve a problem right away so it feels like we’re making progress or looks like we’re being responsive to stakeholders. This can introduce risks if we aren’t asking the right questions before doing so, fully considering causes and consequences. Put another way, critical thinking is thinking on purpose and forming your own conclusions. This goal-directed thinking can help you focus on root-cause issues that avoid future problems that arise from not keeping in mind causes and consequences.

Critical thinkers:
➡️ Raise mindful questions, formulating them clearly and precisely
➡️ Collect and assess relevant information, validating how they might answer the question
➡️ Arrive at well-reasoned conclusions and solutions, testing them against relevant criteria and standards
➡️ Think open mindedly within alternative systems of thought, recognizing and assessing, as need be, their assumptions, implications, and practical consequences
➡️ Communicate effectively with others in figuring out solutions to complex problems

Why i switched form docker desktop to Colima

DDEV is an open source tool that makes it simple to get local PHP development environments up and running within minutes. It’s powerful and flexible as a result of its per-project environment configurations, which can be extended, version controlled, and shared. In short, DDEV aims to allow development teams to use containers in their workflow without the complexities of bespoke configuration.

DDEV replaces more traditional AMP stack solutions (WAMP, MAMP, XAMPP, and so on) with a flexible, modern, container-based solution. Because it uses containers, DDEV allows each project to use any set of applications, versions of web servers, database servers, search index servers, and other types of software.

In March 2022, the DDEV team announced support for Colima, an open source Docker Desktop replacement for macOS and Linux. Colima is open source, and by all reports it’s got performance gains over its alternative, so using Colima seems like a no-brainer.

Migrating to Colima

First off, Colima is almost a drop-in replacement for Docker Desktop. I say almost because some reconfiguration is required when using it for an existing DDEV project. Specifically, databases must be reimported. The fix is to first export your database, then start Colima, then import it. Easy.

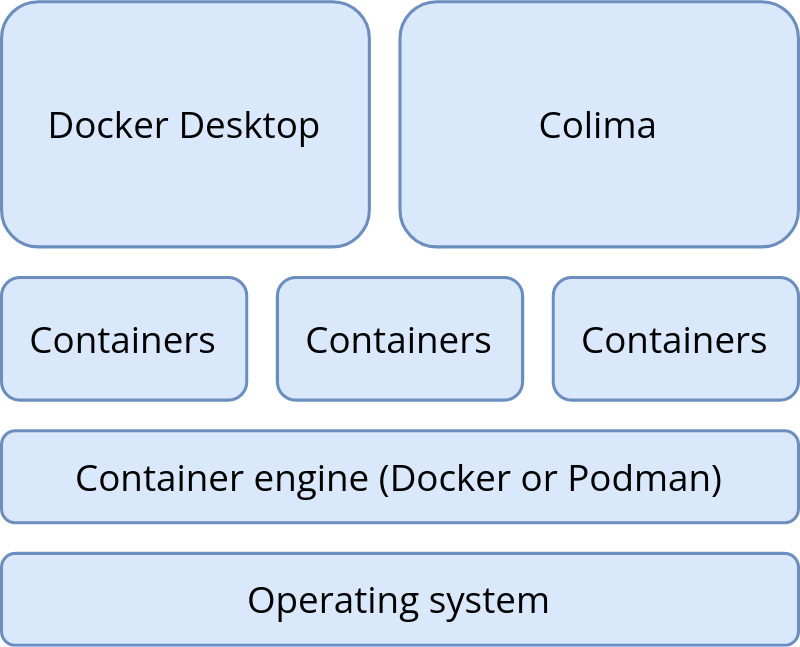
Colima requires that either the Docker or Podman command is installed. On Linux, it also requires Lima.

Docker is installed by default with Docker Desktop for macOS, but it’s also available as a stand-alone command. If you want to go 100% pure Colima, you can uninstall Docker Desktop for macOS, and install and configure the Docker client independently. Full installation instructions can be found on the DDEV docs site.

An image of the container technology stack.

(Mike Anello,CC BY-SA 4.0)

If you choose to keep using both Colima and Docker Desktop, then when issuing docker commands from the command line, you must first specify which container you want to work with. More on this in the next section.

More on Kubernetes

What is Kubernetes?

Free online course: Containers, Kubernetes and Red Hat OpenShift technical over…

eBook: Storage Patterns for Kubernetes

Test drive OpenShift hands-on

An introduction to enterprise Kubernetes

How to explain Kubernetes in plain terms

eBook: Running Kubernetes on your Raspberry Pi homelab

Kubernetes cheat sheet

eBook: A guide to Kubernetes for SREs and sysadmins

Latest Kubernetes articles

Install Colima on macOS

I currently have some local projects using Docker, and some using Colima. Once I understood the basics, it’s not too difficult to switch between them.

  1. To get started, install Colima using Homebrew brew install colima
  2. ddev poweroff (just to be safe)
  3. Next, start Colima with colima start --cpu 4 --memory 4. The --cpu and --memory options only have to be done once. After the first time, only colima start is necessary.
  4. If you’re a DDEV user like me, then you can spin up a fresh Drupal 9 site with the usual ddev commands (ddev config, ddev start, and so on.) It’s recommended to enable DDEV’s mutagen functionality to maximize performance.

Switching between a Colima and Docker Desktop

If you’re not ready to switch to Colima wholesale yet, it’s possible to have both Colima and Docker Desktop installed.

  1. First, poweroff ddev:ddev poweroff
  2. Then stop Colima: colima stop
  3. Now run docker context use default to tell the Docker client which container you want to work with. The name default refers to Docker Desktop for Mac. When colima start is run, it automatically switches Docker to the colima context.
  4. To continue with the default (Docker Desktop) context, use the ddev start command.

Technically, starting and stopping Colima isn’t necessary, but the ddev poweroff command when switching between two contexts is.

Recent versions of Colima revert the Docker context back to default when Colima is stopped, so the docker context use default command is no longer necessary. Regardless, I still use docker context show to verify that either the default (Docker Desktop for Mac) or colima context is in use. Basically, the term context refers to which container provider the Docker client routes commands to.

Try Colima

Overall, I’m liking what I see so far. I haven’t run into any issues, and Colima-based sites seem a bit snappier (especially when DDEV’s Mutagen functionality is enabled). I definitely foresee myself migrating project sites to Colima over the next few weeks.

Luigi è a lavoro ?

Se nei giorni in cui lavoro da remoto entra qualcuno in ufficio chiedendo di me, ecco non dite mai “No, oggi Luigi non c’è, è in smartworking” ma rispondete “Sì, sì, oggi Luigi c’è, lavora in smartworking”.

Si potrebbe sintetizzare così lo smartworking, in italiano il lavoro agile. Perché si lavora anche così, non necessariamente seduti alla scrivania nel proprio ufficio. L’abbiamo imparato, chi già non lo faceva prima, in questi due anni di pandemia. Ci si può organizzare meglio, si risparmia tempo e tanto la produttività quanto la vita personale ne traggono vantaggio. Win-win, per stare sull’inglese. Che poi, per rispondere agli scettici, guardate che chi non lavora da casa, di regola non lavora neppure dall’ufficio.

Dal 1 settembre, ormai ci siamo, torna obbligatorio l’accordo individuale, sospeso negli ultimi due anni. Cos’è? È il fulcro dello smartworking (che ricordiamo non è un contratto di lavoro ma una sua modalità di esecuzione).

Datore di lavoro e lavoratore si devono mettere d’accordo su come organizzare il lavoro, in parte all’interno dei locali aziendali e in parte all’esterno, senza precisi vincoli di orario e di luogo di lavoro. È un accordo, il che significa che se una delle parti non è – appunto – d’accordo non se ne fa nulla. Ed è individuale, non collettivo (anche se spesso regolamenti o contratti collettivi possono dare indicazioni).

L’accordo deve essere stipulato in forma scritta, dicono le norme, “ai fini della regolarità amministrativa e della prova” e deve essere conservato dal datore di lavoro per cinque anni dalla sua sottoscrizione. Nessuna sanzione esplicita se manca l’accordo, ma conseguenze in base ai fini che è chiamato a raggiugere. Come provare i contenuti dell’accordo? Quali le conseguenze in caso di infortunio?

Novità degli ultimi giorni: l’accordo individuale, a differenza del periodo pre-pandemico, non deve più essere trasmesso al Ministero del Lavoro al quale basterà sapere (oltre all’elenco dei lavoratori interessati) la data di sottoscrizione dell’accordo e la sua durata. La comunicazione di questi dati (che poi il Ministero trasmetterà all’Inail) dovrà essere effettuata entro cinque giorni dalla sottoscrizione dell’accordo, pena una sanzione pecuniaria da 100 a 500 euro. Per la prima fase transitoria il termine è fissato al 1 novembre.

Bene, inizia la fase due dello smartworking ordinario e non più emergenziale!

E ricordatevi che risposta dare quando, non trovandomi in ufficio, vi chiederanno “Oggi Luigi è al lavoro?”.

Migrate databases to Kubernetes using Konveyor

Ships at sea on the web

Kubernetes Database Operator is useful for building scalable database servers as a database (DB) cluster. But because you have to create new artifacts expressed as YAML files, migrating existing databases to Kubernetes requires a lot of manual effort. This article introduces a new open source tool named Konveyor Tackle-DiVA-DOA (Data-intensive Validity Analyzer-Database Operator Adaptation). It automatically generates deployment-ready artifacts for database operator migration. And it does that through datacentric code analysis.

What is Tackle-DiVA-DOA?

Tackle-DiVA-DOA (DOA, for short) is an open source datacentric database configuration analytics tool in Konveyor Tackle. It imports target database configuration files (such as SQL and XML) and generates a set of Kubernetes artifacts for database migration to operators such as Zalando Postgres Operator.

A flowchart shows a database cluster with three virtual machines and SQL and XML files transformed by going through Tackle-DiVA-DOA into a Kubernetes Database Operator structure and a YAML file

DOA finds and analyzes the settings of an existing system that uses a database management system (DBMS). Then it generates manifests (YAML files) of Kubernetes and the Postgres operator for deploying an equivalent DB cluster.

A flowchart shows the four elements of an existing system (as described in the text below), the manifests generated by them, and those that transfer to a PostgreSQL cluster

Database settings of an application consist of DBMS configurations, SQL files, DB initialization scripts, and program codes to access the DB.

  • DBMS configurations include parameters of DBMS, cluster configuration, and credentials. DOA stores the configuration to postgres.yaml and secrets to secret-db.yaml if you need custom credentials.
     
  • SQL files are used to define and initialize tables, views, and other entities in the database. These are stored in the Kubernetes ConfigMap definition cm-sqls.yaml.
     
  • Database initialization scripts typically create databases and schema and grant users access to the DB entities so that SQL files work correctly. DOA tries to find initialization requirements from scripts and documents or guesses if it can’t. The result will also be stored in a ConfigMap named cm-init-db.yaml.
     
  • Code to access the database, such as host and database name, is in some cases embedded in program code. These are rewritten to work with the migrated DB cluster.

Tutorial

DOA is expected to run within a container and comes with a script to build its image. Make sure Docker and Bash are installed on your environment, and then run the build script as follows:

cd /tmp
git clone https://github.com/konveyor/tackle-diva.git
cd tackle-diva/doa
bash util/build.sh

docker image ls diva-doa
REPOSITORY   TAG       IMAGE ID       CREATED        SIZE
diva-doa     2.2.0     5f9dd8f9f0eb   14 hours ago   1.27GB
diva-doa     latest    5f9dd8f9f0eb   14 hours ago   1.27GB

This builds DOA and packs as container images. Now DOA is ready to use.

The next step executes a bundled run-doa.shwrapper script, which runs the DOA container. Specify the Git repository of the target database application. This example uses a Postgres database in the TradeApp application. You can use the -o option for the location of output files and an -i option for the name of the database initialization script:

cd /tmp/tackle-diva/doa
bash run-doa.sh -o /tmp/out -i start_up.sh \
      https://github.com/saud-aslam/trading-app
[OK] successfully completed.

The /tmp/out/ directory and /tmp/out/trading-app, a directory with the target application name, are created. In this example, the application name is trading-app, which is the GitHub repository name. Generated artifacts (the YAML files) are also generated under the application-name directory:

ls -FR /tmp/out/trading-app/
/tmp/out/trading-app/:
cm-init-db.yaml  cm-sqls.yaml  create.sh*  delete.sh*  job-init.yaml  postgres.yaml  test//tmp/out/trading-app/test:
pod-test.yaml

The prefix of each YAML file denotes the kind of resource that the file defines. For instance, each cm-*.yamlfile defines a ConfigMap, and job-init.yamldefines a Job resource. At this point, secret-db.yaml is not created, and DOA uses credentials that the Postgres operator automatically generates.

Now you have the resource definitions required to deploy a PostgreSQL cluster on a Kubernetes instance. You can deploy them using the utility script create.sh. Alternatively, you can use the kubectl createcommand:

cd /tmp/out/trading-app
bash create.sh  # or simply “kubectl apply -f .”configmap/trading-app-cm-init-db created
configmap/trading-app-cm-sqls created
job.batch/trading-app-init created
postgresql.acid.zalan.do/diva-trading-app-db created

The Kubernetes resources are created, including postgresql (a resource of the database cluster created by the Postgres operator), servicerspodjobcmsecretpv, and pvc. For example, you can see four database pods named trading-app-*, because the number of database instances is defined as four in postgres.yaml.

$ kubectl get all,postgresql,cm,secret,pv,pvc
NAME                                        READY   STATUS      RESTARTS   AGE

pod/trading-app-db-0 1/1     Running     0          7m11s
pod/trading-app-db-1 1/1     Running     0          5m
pod/trading-app-db-2 1/1     Running     0          4m14s
pod/trading-app-db-3 1/1     Running     0          4mNAME                                      TEAM          VERSION   PODS   VOLUME   CPU-REQUEST   MEMORY-REQUEST   AGE   STATUS
postgresql.acid.zalan.do/trading-app-db   trading-app   13 4      1Gi                                     15m   RunningNAME                            TYPE        CLUSTER-IP      EXTERNAL-IP   PORT(S)    AGE
service/trading-app-db          ClusterIP   10.97.59.252    <none> 5432/TCP   15m
service/trading-app-db-repl     ClusterIP   10.108.49.133   <none> 5432/TCP   15mNAME                         COMPLETIONS   DURATION   AGE
job.batch/trading-app-init   1/1           2m39s      15m

Note that the Postgres operator comes with a user interface (UI). You can find the created cluster on the UI. You need to export the endpoint URL to open the UI on a browser. If you use minikube, do as follows:

$ minikube service postgres-operator-ui

Then a browser window automatically opens that shows the UI.

Screenshot of the UI showing the Cluster YAML definition on the left with the Cluster UID underneath it. On the right of the screen a header reads "Checking status of cluster," and items in green under that heading show successful creation of manifests and other elements

(Yasuharu Katsuno and Shin Saito, CC BY-SA 4.0)

Now you can get access to the database instances using a test pod. DOA also generated a pod definition for testing.

$ kubectl apply -f /tmp/out/trading-app/test/pod-test.yaml # creates a test Pod
pod/trading-app-test created
$ kubectl exec trading-app-test -it -- bash # login to the pod

The database hostname and the credential to access the DB are injected into the pod, so you can access the database using them. Execute the psql metacommand to show all tables and views (in a database):

# printenv DB_HOST; printenv PGPASSWORD
(values of the variable are shown)# psql -h ${DB_HOST} -U postgres -d jrvstrading -c '\dt'
             List of relations
 Schema |      Name      | Type  |  Owner  
--------+----------------+-------+----------
 public | account        | table | postgres
 public | quote          | table | postgres
 public | security_order | table | postgres
 public | trader         | table | postgres
(4 rows)# psql -h ${DB_HOST} -U postgres -d jrvstrading -c '\dv'
                List of relations
 Schema |         Name          | Type |  Owner  
--------+-----------------------+------+----------
 public | pg_stat_kcache        | view | postgres
 public | pg_stat_kcache_detail | view | postgres
 public | pg_stat_statements    | view | postgres
 public | position              | view | postgres
(4 rows)

After the test is done, log out from the pod and remove the test pod:

# exit
$ kubectl delete -f /tmp/out/trading-app/test/pod-test.yaml

Finally, delete the created cluster using a script:

$ bash delete.sh

Selecting Performance Monitoring Tools

Linux Performance Observability Tools by Brendan Gregg (CC BY-SA 4.0)

System monitoring is a helpful approach to provide the user with data regarding the actual timing behavior of the system. Users can perform further analysis using the data that these monitors provide. One of the goals of system monitoring is to determine whether the current execution meets the specified technical requirements.

These monitoring tools retrieve commonly viewed information, and can be used by way of the command line or a graphical user interface, as determined by the system administrator. These tools display information about the Linux system, such as free disk space, the temperature of the CPU, and other essential components, as well as networking information, such as the system IP address and current rates of upload and download.

Monitoring Tools

The Linux kernel maintains counterstructures for counting events, that increment when an event occurs. For example, disk reads and writes, and process system calls, are events that increment counters with values stored as unsigned integers. Monitoring tools read these counter values. These tools provide either per process statistics maintained in process structures, or system-wide statistics in the kernel. Monitoring tools are typically viewable by non-privileged users. The ps and top commands provide process statistics, including CPU and memory.

Monitoring Processes Using the ps Command

Troubleshooting a system requires understanding how the kernel communicates with processes, and how processes communicate with each other. At process creation, the system assigns a state to the process.

Use the ps aux command to list all users with extended user-oriented details; the resulting list includes the terminal from which processes are started, as well as processes without a terminal. A ? sign in the TTY column represents that the process did not start from a terminal.

[user@host]$ ps aux
USER   PID %CPU %MEM    VSZ   RSS TTY      STAT START TIME COMMAND
user  1350  0.0  0.2 233916  4808 pts/0    Ss   10:00   0:00 -bash
root  1387  0.0  0.1 244904  2808 ?        Ss   10:01 0:00 /usr/sbin/anacron -s
root  1410  0.0  0.0      0     0 ?        I    10:08   0:00 [kworker/0:2...
root  1435  0.0  0.0      0     0 ?        I    10:31   0:00 [kworker/1:1...
user  1436  0.0  0.2 266920  3816 pts/0    R+   10:48   0:00 ps aux

The Linux version of ps supports three option formats:

  • UNIX (POSIX) options, which may be grouped and must be preceded by a dash.
  • BSD options, which may be grouped and must not include a dash.
  • GNU long options, which are preceded by two dashes.

The output below uses the UNIX options to list every process with full details:

[user@host]$ ps -ef
UID        PID  PPID  C STIME TTY          TIME CMD
root         2     0  0 09:57 ?        00:00:00 [kthreadd]
root         3     2  0 09:57 ?        00:00:00 [rcu_gp]
root         4     2  0 09:57 ?        00:00:00 [rcu_par_gp]
...output omitted...

Key Columns in ps OutputPID

This column shows the unique process ID.TIME

This column shows the total CPU time consumed by the process in hours:minutes:seconds format, since the start of the process.%CPU

This column shows the CPU usage during the previous second as the sum across all CPUs expressed as a percentage.RSS

This column shows the non-swapped physical memory that a process consumes in kilobytes in the resident set size, RSS column.%MEM

This column shows the ratio of the process’ resident set size to the physical memory on the machine, expressed as a percentage.

Use the -p option together with the pidof command to list the sshd processes that are running.

[user@host ~]$ ps -p $(pidof sshd)
  PID TTY      STAT   TIME COMMAND
  756 ?        Ss     0:00 /usr/sbin/sshd -D [email protected]...
 1335 ?        Ss     0:00 sshd: user [priv]
 1349 ?        S      0:00 sshd: user@pts/0

Use the following command to list of all processes sorted by memory usage in descending order:

[user@host ~]$ ps ax --format pid,%mem,cmd --sort -%mem
  PID %MEM CMD
  713  1.8 /usr/libexec/sssd/sssd_nss --uid 0 --gid 0 --logger=files
  715  1.8 /usr/libexec/platform-python -s /usr/sbin/firewalld --nofork --nopid
  753  1.5 /usr/libexec/platform-python -Es /usr/sbin/tuned -l -P
  687  1.2 /usr/lib/polkit-1/polkitd --no-debug
  731  0.9 /usr/sbin/NetworkManager --no-daemon
...output omitted...

Various other options are available for ps including the o option to customize the output and columns shown.

Monitoring Process Using top

The top command provides a real-time report of process activities with an interface for the user to filter and manipulate the monitored data. The command output shows a system-wide summary at the top and process listing at the bottom, sorted by the top CPU consuming task by default. The -n 1 option terminates the program after a single display of the process list. The following is an example output of the command:

[user@host ~]$ top -n 1
Tasks: 115 total,   1 running, 114 sleeping,   0 stopped,   0 zombie
%Cpu(s):  0.0 us,  3.2 sy,  0.0 ni, 96.8 id,  0.0 wa,  0.0 hi,  0.0 si,  0.0 st
MiB Mem :   1829.0 total,   1426.5 free,    173.6 used,    228.9 buff/cache
MiB Swap:      0.0 total,      0.0 free,      0.0 used.   1495.8 avail Mem

  PID USER      PR  NI    VIRT    RES    SHR S  %CPU  %MEM     TIME+ COMMAND
    1 root      20   0  243968  13276   8908 S   0.0   0.7   0:01.86 systemd
    2 root      20   0       0      0      0 S   0.0   0.0   0:00.00 kthreadd
    3 root       0 -20       0      0      0 I   0.0   0.0   0:00.00 rcu_gp
...output omitted...

Useful Key Combinations to Sort FieldsRES

Use Shift+M to sort the processes based on resident memory.PID

Use Shift+N to sort the processes based on process ID.TIME+

Use Shift+T to sort the processes based on CPU time.

Press F and select a field from the list to use any other field for sorting.

IMPORTANT

The top command imposes a significant overhead on the system due to various system calls. While running the top command, the process running the top command is often the top CPU-consuming process.

Monitoring Memory Usage

The free command lists both free and used physical memory and swap memory. The -b-k-m-g options show the output in bytes, KB, MB, or GB, respectively. The -s option is passed as an argument that specifies the number of seconds between refreshes. For example, free -s 1 produces an update every 1 second.

[user@host ~]$ free -m
              total        used        free      shared  buff/cache   available
Mem:           1829         172        1427          16         228        1496
Swap:             0           0           0

The near zero values in the buff/cache and available columns indicate a low memory situation. If the available memory is more than 20% of the total, and the used memory is close to the total memory, then these values indicate a healthy system.

Monitoring File System Usage

One stable identifier that is associated with a file system is its UUID, a very long hexadecimal number that acts as a universally unique identifier. This UUID is part of the file system and remains the same as long as the file system is not recreated. The lsblk -fp command lists the full path of the device, along with the UUIDs and mount points, as well as the type of file system in the partition. If the file system is not mounted, the mount point displays as blank.

[user@host ~]$ lsblk -fp
NAME        FSTYPE LABEL UUID                                 MOUNTPOINT
/dev/vda
├─/dev/vda1 xfs          23ea8803-a396-494a-8e95-1538a53b821c /boot
├─/dev/vda2 swap         cdf61ded-534c-4bd6-b458-cab18b1a72ea [SWAP]
└─/dev/vda3 xfs          44330f15-2f9d-4745-ae2e-20844f22762d /
/dev/vdb
└─/dev/vdb1 xfs          46f543fd-78c9-4526-a857-244811be2d88

The findmnt command allows the user to take a quick look at what is mounted where, and with which options. Executing the findmnt command without any options lists out all the mounted file systems in a tree layout. Use the -s option to read the file systems from the /etc/fstab file. Use the -S option to search the file systems by the source disk.

[user@host ~]$ findmnt -S /dev/vda1
TARGET SOURCE    FSTYPE OPTIONS
/      /dev/vda1 xfs    rw,relatime,seclabel,attr2,inode64,noquota

The df command provides information about the total usage of the file systems. The -h option transforms the output into a human-readable form.

[user@host ~]$ df -h
Filesystem      Size  Used Avail Use% Mounted on
devtmpfs        892M     0  892M   0% /dev
tmpfs           915M     0  915M   0% /dev/shm
tmpfs           915M   17M  899M   2% /run
tmpfs           915M     0  915M   0% /sys/fs/cgroup
/dev/vda1        10G  1.5G  8.6G  15% /
tmpfs           183M     0  183M   0% /run/user/1000

The du command displays the total size of all the files in a given directory and its subdirectories. The -s option suppresses the output of detailed information and displays only the total. Similar to the df -h command, the -h option displays the output into a human-readable form.

[user@host ~]$ du -sh /home/user
16K /home/user

Using GNOME System Monitor

The System Monitor available on the GNOME desktop provides statistical data about the system status, load, and processes, as well as the ability to manipulate those processes. Similar to other monitoring tools, such as the topps, and free commands, the System Monitor provides both the system-wide and per-process data. These monitoring tools retrieve commonly viewed information, and can be used by way of the command line or a graphical user interface, as determined by the system administrator. Use the gnome-system-monitor command to access the application from a command terminal.

To view the CPU usage, go to the Resources tab and look at the CPU History chart.

Figure 2.2: CPU usage history in System Monitor

The virtual memory is the sum of the physical memory and the swap space in a system. A running process maps the location in physical memory to files on disk. The memory map displays the total virtual memory consumed by a running process, which determines the memory cost of running that process instance. The memory map also displays the shared libraries used by the process.

Figure 2.3: Memory map of a process in System Monitor

To display the memory map of a process in System Monitor, locate a process in the Processes tab, right-click a process in the list, and select Memory Maps.

6 Important things you need to run Kubernetes in production

Kubernetes adoption is at an all-time high. Almost every major IT organization invests in a container strategy and Kubernetes is by far the most-used and most popular container orchestration technology. While there are many flavors of Kubernetes, managed solutions like AKS, EKS and GKE are by far the most popular. Kubernetes is a very complex platform, but setting up a Kubernetes cluster is fairly easy as long as you choose a managed cloud solution. I would never advise self-managing a Kubernetes cluster unless you have a very good reason to do so.

Running Kubernetes comes with many benefits, but setting up a solid platform yourself without strong Kubernetes knowledge takes time. Setting up a Kubernetes stack according to best-practices requires expertise, and is necessary to set up a stable cluster that is future-proof. Simply running a manged cluster and deploying your application is not enough. Some additional things are needed to run a production-ready Kubernetes cluster. A good Kubernetes setup makes the life of developers a lot easier and gives them time to focus on delivering business value. In this article, I will share the most important things you need to run a Kubernetes stack in production.

1 – Infrastructure as Code (IaC)

First of all, managing your cloud infrastructure using Desired State configuration (Infrastructure as Code – IaC) comes with a lot of benefits and is a general cloud infrastructure best practice. Specifying it declarative as code will enable you to test your infrastructure (changes) in non-production environments. It discourages or prevents manual deployments, making your infrastructure deployments more consistent, reliable and repeatable. Teams implementing IaC deliver more stable environments rapidly and at scale. IaC tools like Terraform or Pulumi work great to deploy your entire Kubernetes cluster in your cloud of choice together with networking, load balancers, DNS configuration and of course an integrated Container Registry.

2 – Monitoring & Centralized logging

Kubernetes is a very stable platform. Its self-healing capabilities will solve many issues and if you don’t know where to look you wouldn’t even notice. However, that does not mean monitoring is unimportant. I have seen teams running production without proper monitoring, and suddenly a certificate expired, or a node memory overcommit caused an outage. You can easily prevent these failures with proper monitoring in place. Prometheus and Grafana are Kubernetes’ most used monitoring solutions and can be used to monitor both your platform and applications. Alerting (e.g. using the Alertmanager) should be set up for critical issues with your Kubernetes cluster, so that you can prevent downtime, failures or even data loss.

Apart from monitoring using metrics, it is also important to run centralized components like Fluentd or Filebeat to collect logging and send them to a centralized logging platform like ElasticSearch so that application error logs and log events can be traced and in a central place. These tools can be set up centrally, so standard monitoring is automatically in place for all apps without developer effort.

3 – Centralized Ingress Controller with SSL certificate management

Kubernetes has a concept of Ingress. A simple configuration that describes how traffic should flow from outside of Kubernetes to your application. A central Ingress Controller (e.g. Nginx) can be installed in the cluster to manage all incoming traffic for every application. When an Ingress Controller is linked to a public Cloud LoadBalancer, all traffic is automatically loadBalanced among Nodes, and sent to the right pods IP Addresses.

A Ingress Controller gives many benefits, because of its Centralization. It can also take care of HTTPS and SSL. An integrated component called cert-manager is a centrally deployed application in Kubernetes that takes care of HTTPS certificates. It can be configured using Let’s Encrypt, wildcard certificates or even a private Certification Authority for internal company-trusted certificates. All incoming traffic will be automatically encrypted using the HTTPS certificates and forwarded to the correct Kubernetes pods. Another thing developers won’t need to worry about.

4 – Role-Based Access Control (RBAC)

Not everyone should be a Kubernetes Administrator. We should always apply the principle of Least Privilege when it comes to Kubernetes access. Role-Based Access Control should be applied to the whole Kubernetes stack (Kubernetes API, deployment tools, dashboards, etc.). When we integrate Kubernetes with an IAM solution like Keycloak, Azure AD or AWS Cognito, we can centrally manage authentication and authorization using OAuth2 / OIDC for both platform tools and applications. Roles and groups can be defined to give users access to the resources they need to access based on their team or role.

5 – GitOps Deployments

Everyone who works with Kubernetes uses kubectl one way or another. But manually deploying to Kubernetes using the ‘kubectl apply’ command is not a best practice, most certainly not in production. Kubernetes desired state configuration should be present in GIT, and we need a deployment platform that rolls out to Kubernetes. ArgoCD and Flux are the two leading GitOps platforms for Kubernetes deployments. Both work very well for handling real-time declarative state management, making sure that Git is the single source of truth for the Kubernetes state. Even if a rogue developer tries to manually change something in production, the GitOps platform will immediately roll back the change to the desired change. With a GitOps bootstrapping technique we can manage environments, teams, projects, roles, policies, namespaces, clusters, appgroups and applications. With Git only. GitOps makes sure that all changes to all Kubernetes environments are 100% traceable, easily automated and manageable.

6 – Secret Management

Kubernetes secret manifests are used to inject secrets into your containers, either as environment variables or file mappings. Preferably, not everyone should be able to access all secrets, especially in production. Using Role-Based Access Control on secrets for team members and applications is a security best practice. Secrets can be injected into Kubernetes using a CI / CD tooling or (worse) via a local development environment, but this can result in configuration state drift. This is not traceable, and not easily manageable. The best way to sync secrets is using a central vault, like Azure Key Vault, Hashicorp Vault, AWS Secrets Manager with a central secrets operator like External Secrets Operator. This way, secret references can be stored in GIT, pointing to an entry in an external secrets Vault. For more security-focused companies it is also an option to lock out all developers from secrets in Kubernetes using RBAC. They will be able to reference secrets, and use them in containers, but will never be able to directly access them.

Conclusion

Spinning-up a managed Kubernetes cluster is easy, but setting it up correctly takes time if you don’t have the expertise. It is very important to have a good Infrastructure as Code solution, proper monitoring, RBAC and Deployment mechanisms that are secure, manageable and traceable. The earlier, the better. Setting up your Kubernetes cluster according to best practices using standardized open source tooling will help you save time, failures and headaches, especially in the long run. Of course, these are the most basic requirements for your Kubernetes stack, especially for enterprise-level companies. Other important considerations that have not been mentioned are ServiceMesh, Security scanning / compliance, end-to-end traceability, which will be discussed in a future article.